JAVA9 에서 ECLIPSE 가 시작이 되지 않는 경우
테스트 환경 : MacOSX (High Sierra) + Oracle JDK9 + Eclipse (Oxygen)
Eclipse 설치 후 실행하면, "An error has occurred, see the log file null" 이라는 메세지가 나오면서 eclipse 가 강제로 종료되는 현상이 발생
해결 방법
아래 경로에 가서
/Applications/Eclipse.app/Contents/Eclipse |
eclipse.ini 파일을 편집
-vmargs 항목에 파라미터를 하나 추가해 준다.
|
-vmargs --add-modules=java.se.ee |
이렇게 해서 해결이 되는 경우가 대부분인데 해결이 되지 않는 경우도 있다고 함..
Hibernate dao code generator 설정
개발 환경
JDK 1.8.x
MySQL
먼저 Eclipse 를 실행합니다.
참고로 저는 최신버전 LUNA를 사용중입니다.
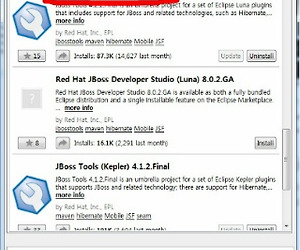
Help -> Install New Software 선택
Find 에 hibernate 을 입력하여 검색
JBoss Tools 를 설치합니다.
그리고 eclipse에 hibernate을 사용할 프로젝트를 생성합니다. (여기서는 편의상 HibernateDB001 java 프로젝트)
MySQL DB와의 연결을 위해서 JDBC 드라이버를 build path 에 추가합니다.
MySQL JDBC 드라이버는 아래 링크에서 다운로드가 가능합니다.
http://dev.mysql.com/downloads/connector/j/
저는 프로젝트에 lib 폴더를 만들어서 jar 파일을 추가하고 build path에 추가하였습니다.
그리고 Hibernate prospect 에서 config 파일을 생성합니다.
위의 아이콘을 클릭하거나 오른쪽 클릭하여 config 파일을 생성합니다.
hibernate.cfg.xml 파일을 생성합니다.
DB설정에 맞게 필요한 정보를 입력하고 Finish 를 누릅니다.
최종 설정은 대략 다음과 같습니다.
위의 정보를 제대로 입력했다면 Database에 아래와 같이 DB 정보가 나오게 됩니다.
Eclipse 위쪽의 Hibernate Code Generation 아이콘을 눌러서 코드를 생성합니다.
필요한 옵션은 다음과 같습니다.
ps. 내용 추가합니다.
hibernate 코드를 생성하려고 할때, hibernate.cfg.xml 을 파싱할 수 없다는 에러가 나는 경우가 있습니다.
Configuration 부분에 classpath에 에러 표시가 나타나면서 파싱이 안되는 경우인데요,
(Could not parse configuration 등의 에러..)
이 경우 hibernate.cfg.xml 파일의 헤더부분에 나오는 http://hibernate.sourceforge.net 부분을 http://www.hibernate.org/dtd 로 변경하면 문제가 해결됩니다. 구글링 결과 네트워크 연결이 되지 않거나 해당 사이트에 접속이 되지 않는 경우 생기는 문제라고 하니, parsing 에러가 나타나는 경우 위와 같이 변경하면 해결이 되는 경우가 있으니 참고하세요.
[JAVA][CLASS] GmailSMTP.java - Gmail SMTP 를 이용하여 메일 보내기
import java.util.Properties;
import javax.mail.Message;
import javax.mail.MessagingException;
import javax.mail.PasswordAuthentication;
import javax.mail.Session;
import javax.mail.Transport;
import javax.mail.internet.InternetAddress;
import javax.mail.internet.MimeMessage;
public class GmailSMTP
{
public static void sendMail(String account, String auth, String to, String subject, String msg, boolean isSSL, boolean isHtml)
{
final String username = account;
final String password = auth;
String mailFrom = username;
String mailTo = to;
Properties props = new Properties();
props.put("mail.smtp.auth", "true");
props.put("mail.smtp.host", "smtp.gmail.com");
if (isSSL)
{
props.put("mail.smtp.socketFactory.port", "465");
props.put("mail.smtp.socketFactory.class", "javax.net.ssl.SSLSocketFactory");
props.put("mail.smtp.port", "465");
}
else
{
props.put("mail.smtp.starttls.enable", "true");
props.put("mail.smtp.port", "587");
}
Session session = Session.getInstance(props, new javax.mail.Authenticator()
{
protected PasswordAuthentication getPasswordAuthentication()
{
return new PasswordAuthentication(username, password);
}
});
try
{
Message message = new MimeMessage(session);
message.setFrom(new InternetAddress(mailFrom));
message.setRecipients(Message.RecipientType.TO, InternetAddress.parse(mailTo));
message.setSubject(subject);
if (isHtml)
message.setContent(msg, "text/html");
else
message.setText(msg);
Transport.send(message);
}
catch (MessagingException e)
{
throw new RuntimeException(e);
}
}
}
[ECLIPSE] eclipse 개발 환경 설정 (ant, jsch 포함)
@ 준비물
아래 링크에서 적당한 버전의 Java SDK 를 다운로드 합니다.
http://www.oracle.com/technetwork/java/javase/downloads/index.html
아래 링크에서 적당한 버전의 eclipse 를 다운로드 합니다.
http://www.eclipse.org/downloads/
아래 링크에서ant 를 다운로드 합니다.
http://ant.apache.org/bindownload.cgi
아래 링크에서 jsch를 다운로드 합니다.
@ 설치
Java는 default 폴더에 설치하는 것을 권장합니다.
eclipse 는 My Document 에 압축을 풀면 됩니다.
ant 는 eclipse 설치 경로 아래 있는 plugins 폴더에 압축을 풀어줍니다.
jsch 는 ant 폴더 아래 있는 lib 폴더에 jar 파일만 추가합니다.
eclipse 를 실행합니다.
Window > Preferences > Ant > Runtime
Classpath 탭에 있는 Ant Home 버튼을 눌러서 압축을 푼 ant 경로를 지정합니다.
[JAVA][CLASS] ZipUtil.java - Compress Data and Decompress Data
import java.io.ByteArrayOutputStream;
import java.util.zip.Deflater;
import java.util.zip.Inflater;
public class ZipUtil {
public static final int BUF_SIZE = 1024;
public static ZipUtil instance = null;
private ZipUtil() {
}
public static ZipUtil getInstance() {
if (instance == null)
instance = new ZipUtil();
return instance;
}
public byte[] compress(byte[] input) {
if (input == null)
return null;
byte[] buf = new byte[BUF_SIZE];
ByteArrayOutputStream baos = new ByteArrayOutputStream();
Deflater def = new Deflater();
def.setInput(input);
def.finish();
try {
while (!def.finished()) {
int count = def.deflate(buf);
baos.write(buf, 0, count);
}
} catch (Exception e) {
e.printStackTrace();
} finally {
def.end();
}
return baos.toByteArray();
}
public byte[] decompress(byte[] input) {
if (input == null)
return null;
byte[] buf = new byte[BUF_SIZE];
ByteArrayOutputStream baos = new ByteArrayOutputStream();
Inflater inf = new Inflater();
inf.setInput(input);
try {
while (true) {
int count = inf.inflate(buf);
if (count > 0) {
baos.write(buf, 0, count);
} else if (count == 0 && inf.finished()) {
break;
} else {
throw new RuntimeException();
}
}
} catch (Exception e) {
e.printStackTrace();
} finally {
inf.end();
}
return baos.toByteArray();
}
}
[Java Code Sample] Save Image
[Java Code Sample] String to Blob..
public String byte2HexStr(byte pByte)
{
StringBuffer sb = new StringBuffer();
for (int i = 0; i < 2; i++) {
int tInt = (pByte >> 4 * (1-i)) & 0x0f;
if (tInt > 9) sb.append((char)('A' + (tInt - 10)));
else sb.append((char)('0' + tInt));
}
return sb.toString();
}
public String byteArray2Blob(byte[] pByteArray)
{
String rv = null;
if (pByteArray != null)
{
StringBuffer sb = new StringBuffer("X'");
for(int i = 0; i < pByteArray.length; i++)
{
sb.append(byte2HexStr(pByteArray[i]));
}
sb.append("'");
rv = sb.toString();
}
return rv;
}
public String str2Blob(String pStr)
{
String rv = null;
if (pStr != null)
{
byte[] tByteArray = pStr.getBytes();
rv = byteArray2Blob(tByteArray);
tByteArray = null;
}
return rv;
}


